Using Chameleon UIKit to build an iOS app for OSX
Filed under: All , Programming , iOS , ObjectiveC , XCode , iPhone , OSX , Chameleon
UIKit is an amazing piece of work, and it lowers the bar for iOS applications tremendously, which is attested to by the number of applications on the iOS App Store.
Chameleon (http://chameleonproject.org/) is a port of Apple’s UIKit to the Mac OS X. This means it’s designed as a drop in replacement framework which you can build against for OSX Applications. It’s been developed and used for Twitterrific by The Iconfactory, but the source is up on github https://github.com/BigZaphod/Chameleon
Since then a number of other people have contributed to it helping to finish features. One challenge that I’ve had in getting started with it, is simply not having as many references as I would for iOS development.
This is meant to be a guide to get up and running with a simple UIViewController application on OSX.
First get a copy of Chameleon
cd projects
git clone git://github.com/BigZaphod/Chameleon.git
Next start a new application, we will call it TestUIViewController
Open up Xcode, select File→New→New Project. Then under Mac OS X select Cocoa Application. (I’ve un-checked ARC counting). When prompted for a directory to create the new project in, select the projects directory above.
From finder drag UIKit.xcodeproj from projects/Chameleon/UIKit directly inside of the TestUIViewController project

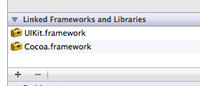
Next add UIKit.framework as a linked framework under TestUIViewController Summary.

Execution for an OSX application typically starts at the ApplicationDelegate.m We need to add a ChameleonAppDelegate.m which will load the UIKit components.
in AppDelegate.h should end up like this
in AppDelegate.m should look like this
Add a ChameleonAppDelegate.h
Add ChameleonAppDelegate.m
open up MainMenu.xib and add a CustomView inside of the existing View, and change the class for it to UIKitView. Connect the chameleonNSView outlet from App Delegate to the UIKitView instance just added.

Create a TestUIViewController Class. File→New→New File and select iOS→Cocoa Touch→UIViewController Subclass named TestUIViewController.
At this point in time, you can begin to write “normal” iOS code to load UI elements in viewDidLoad. Something simple might be to just change the window background color self.view.backgroundColor = [UIColor lightGrayColor], or allocating a UIButton and adding it to the view with [self.view addSubview:button]